Showing posts with label DIYs and recipes. Show all posts

Sunday, 10 November 2013

knitted wrist warmers!


A couple of weeks ago I made myself a pair of wrist warmers using the wool left over from my scarf. Without even looking at the pattern I naïvely presumed that I'd need circular needles to knit something tubular, but no! Turns out that wrist warmers are the simplest things in the world to make. All they are are simple rib stitch!


(The pattern recommended 6mm needles but I used chunky wool on 5mm and I think they look fine and it wasn't difficult to work with.)

Cast on 29 stitches (this was fine for me, but for Mitch's pair they needed to be bigger - 35 stitches)
Row 1: knit 1, purl 1, knit 1 etc until the end of the row
Row 2: purl 1, knit 1, purl 1 etc until the end of the row.
Repeat x however many rows you want it to be. I completely lost count how many rows mine were but they measure 20 cm in length.
Cast off. You should be left with a nice ribbed rectangle.
Use mattress stitch to join the two raw edges until about 14 cm up. Leave enough room for a thumb sized hole and then continue to join the remaining part of the seam. (I used this tutorial as I'd never heard of mattress stitch before).
Weave in the loose ends and then repeat all the steps to make your matching wrist warmer.

Although they probably won't be much use when it gets really cold, they're perfect for autumn and for anyone wanting to get into knitting :)


Wednesday, 16 October 2013

pretend rice that's rather nice

I like rice - it's the perfect side dish to lots of meals BUT I find it to be rather filling. I may have mastered how to cook it successfully (1 cup of rice to 2 cups of water works every time) but I still lack the ability to cook the correct amount. So, instead of cooking waaaaay too much and either throwing it away or eating it out of guilt, I've found the perfect substitute which is easy to control (portion wise) and won't leave you feeling bloated after eating, plus it's one of your five a day. The answer, my friends, is cauliflower.

I think this idea has been doing the rounds on pinterest but I just wanted to say that it works really REALLY well. Rosie used it for a chinese style dish and I've seen it used to accompany an indian curry. I've now used cauliflower instead of rice the last 4 times I've made curry at home and every time it's a winner. Incase you'd like to try it, here's how...
1. Remove the leaves from your cauliflower (one should be enough for two people, or if it's a particularly small one you may need one and a half). Chop into small-ish chunks.
2. Whack the cauliflower chunks in the blender (you may need to do this in two or three batches) and pulse until it's shredded into fine, rice-size pieces. If you have a food processor you'd be better off using that, then you can just shove the lot in in one go.
3. Fry the blended cauliflower in two batches over a medium heat with two teaspoons of oil and one teaspoon of cumin. Stir it regularly and after about 10 mins the cauliflower should turn a slightly golden colour which is cooked enough for me but you could leave it a bit longer, just don't let it burn.
4. Fry the second batch in the same way (avec oil and cumin, but be warned the second batch might not need as long as the first half). Chop up a few leaves of coriander and mix into the cauliflower. And your done!
Of course, if you want to be super healthy you could just heat the cauliflower in the mircowave after you've blended it, but I do think frying it in a little bit of oil and cumin gives it more flavour. I'd be interested to know if anyone else has tried it!


Monday, 5 August 2013

DIY ipod case

I haven't done a DIY for quite some time... so here's something super simple, and rather handy, to make. I actually made this for a friend's birthday and snapped some pics along the way!
1. Cut out some fabrics strips - this is a pretty good way to use up your scraps if you have any lying about. I used 7 strips to make this ipod touch case, around 16cm in length.

2.Stitch them together along the long edge with right sides facing.

3. Once you've stitched all the strips together cut out a piece of wadding and backing fabric. They need to be a little bit bigger than your strippy patchwork piece.

4. Make a sandwich - patchwork on top, wadding in the middle and backing fabric at the bottom. Pin the layers together and then quilt! I just did a random zig-zag pattern but you can do whatever you fancy.

5. Trim away the excess wadding and backing fabric so that all the edges of the sandwich are even.

6. To make the loop, cut a strip of fabric 2 x 12 cm and fold length ways into thirds and stitch down the middle.

7. Make the stitched strip form a loop by pinning it to the top edge of the quilted sandwich. To make the linning, cut another piece of fabric to the size of the sandwich and pin right side down ontop of the patchwork layer. Make sure that the loop is in between the right sides of the lining and patchwork layers.

8. Stitch around the outer edge of the sandwich but leave a gap on the bottom edge to turn the case the right way out.

9. Turn the case the right side out and slip stitch the gap closed.

10. Use a pin to mark where to sew on the button. (It's best do to this bit with the case folded around the ipod so you get a better idea of how far the button needs to be from the top edge. The tighter it is the more secure your ipod is.)
11. Once the button is sewn on, fold the case around the ipod again, pin in place and hand stitch the bottom edges and side edges together. (Again, keeping the ipod in place just means you can make sure that the case is nice and snug!)

And you're done!

Friday, 15 February 2013

boursin muffins


Savoury muffins were a new challenge for me and as this attempt wasn't a complete disaster I thought I'd share them with you.

I love boursin (more than is probably socially acceptable) so it seemed like the logical choice for the main ingredient.

I used this recipe but added a bit more milk than it states. Once I'd combined everything the mixture looked really dry so in went more milk...Also, I couldn't find oat bran in either of my local supermarkets so I used porridge oats, not entirely sure if it matters... Next time I make them I think I might add more boursin (can't hurt) and, rather importantly, remember to take them out of the oven before they start to burn, oops!
They taste at their best slightly warm with a little bit of butter. And FYI they make a great bready accompaniment to soup (if you don't have any actual bread to hand)! I'm going to try some other boursin based recipes...scones seem like a good bet...

Tuesday, 12 February 2013

alex's american pancakes

I've had these beauties two weekends in a row because 1. they are delish and 2. they require v.little skill and few ingredients! Perhaps this could even be an alternative to your traditional pancake tuesday treat... So here they are: the tastiest and simplest pancakes you've ever made! 

makes 6 pancakes
1 1/4 cups of plain flour
1 tbsp sugar
2 tsp baking powder
1/2 tsp salt
2 tbsp oil (I used vegetable but I don't think it matters greatly)
1 1/2 cups of milk (or water to make this vegan friendly)

Combine all the ingredients together, a few little lumps are fine. It should be a good deal thicker than your traditional pancake mixture. In a frying pan cook a ladel sized portion in a little oil, wait until the underside it cooked before flipping it over (duh).

I went with Alex's original recipe and included chocolate chips but you can have whatever you want with them - bananas, berries, bacon, icecream, yoghurt, maple syrup - SO many possibilities :) 
happy pancake day!

Wednesday, 19 December 2012

christmassy place cards


Today I wrote a post over at ivy and neat with a super simple tutorial about how to make your own place cards. My sister and I used to make them when we were little and I thought that it'd be a great way to get little ones involved with the Christmas table setting, alternatively it's just as nice a thing to do as an adult too! To see how to make your own click here.


Thursday, 8 November 2012

pumpkin soup

What with it getting seriously wintry over the last few weeks and the fact that I had half a pumpkin to make use of, I decided that it was time. Time for soup.

Makes 2 v.generous portions (or you can freeze it for a later date if you can't finish it all in two sittings)

What you'll need
one & a half onions finely chopped
half a pumpkin peeled, de-seeded and cut into chunks
salt and pepper
1 red chilli finely chopped
450 ml of vegetable stock
80 ml of double cream
  1. Fry the onions with oil in a saucepan on a low heat until they are soft but not browned. 
  2. Add the pumpkin chunks, increase the heat, stirring occasionally so it doesn't stick to the bottom of the pan or burn. 
  3. After 10 minutes or so the pumpkin should be starting to soften, add the seasoning, chilli and vegetable stock. Bring to the boil and then simmer for 10 minutes or until the pumpkin is v.soft. 
  4. Stir in the double cream and bring back to the boil.
  5. Ladle mixture into a blender (or use a hand blender if you've got one, I really should invest in one) and pulse until smooth.   
Enjoy with buttered toast or croutons.


Wednesday, 26 September 2012

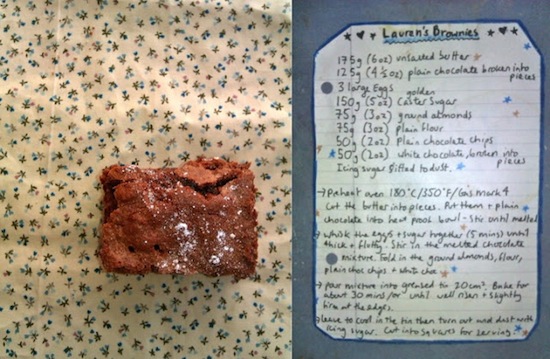
a much loved recipe: chocolate brownies

This chocolate brownies recipe is one of my staples. I've been using the same one since I returned from uni (ahem, four years ago). Before we all parted ways at the end of third year I compiled a cookbook featuring all my flat mates' best recipes - this was one of them.

Ingredients:
175g (6oz) unsalted butter
125g (4 1/2 oz) plain (or dark) chocolate - broken into pieces for melting
3 large eggs
150g (5oz) golden caster sugar
75g (3oz) ground almonds
75g (3oz) plain flour
50g (2oz) plain chocolate chips (although I used milk chocolate on this occasion)
50g (2oz) white chocolate broken into smallish pieces
icing sugar to dust

What you gotta do:
Preheat the oven to 180 degrees C (that's 350 F).
Cut the butter into pieces and melt, along with the plain (or dark) chocolate, in a saucepan. Keep it on a low-medium heat and keep stirring - don't let the mixture burn or get stuck to the bottom!
Whisk the eggs and sugar together, around 5 mins should do it, until think and fluffy. Combine with the melted chocolate/butter mixed.
Fold in the ground almonds, flour, white chocolate pieces and plain chocolate chips.
Pour the mixture into a lined 20x20cm tin.
Bake for about 30 mins or until well risen and slightly firm at the edges.
Leave to cool in the tin and then turn out and dust with icing sugar. 
Cut into squares and then eat or, if you're feeling generous, share them!
Although I've not tired another brownies recipe it doesn't mean I'm not up for the challenge (I just know this one always turns out well). So, if you know of an excellent brownie recipe please do tell - I am aware that I am a creature of habit, cooking and baking the same (loved) recipes time after time but perhaps it's time for a change...one things for certain, I've got a growing pinterest board boasting all sorts of amazing foods and they aren't going to cook themselves!


Monday, 13 August 2012

cheat's bunting


If truth be told I'm still recovering from a v.busy weekend: On saturday Mitch and I journeyed to Essex to visit his parents, on the way home from the trip we spontaneously decided to drop by Hyde Park to watch some of the games on the big screens (which was actually really fun and I wished we'd done it earlier) and saw team GB's Campbell beat his Irish opponent to win the gold medal in boxing! On sunday we held our first ever BBQ in our little Brixton garden. I say 'we' but Mitch did all the food - jerk chicken (fast becoming his signature dish), goat curry, potato salad (with a german twist), red cabbage coleslaw and a beetroot salad. I helped out where I could - chopping vegetables, setting up the chairs and tables in the garden - but Mitch pretty much had the situation under control. So, with an hour or so before the guests began to arrive I thought the occasion could do with some bunting (every occasion deserves bunting)! I didn't have time to make the double sided kind so here's what I call cheat's bunting - perfect if you're a little strapped for time!

1. Make a template out of card to the size you'd like the flags to be. Pin the template to the fabric and cut around it using pinking shears.

2. Fold over the short edge of the flag to the wrong side of the fabric (if it has one). This is where the string will pass through so be sure to make a big enough fold (3-4cm should be fine). Stitch the fold in place around 5mm from the raw edge.

3. Repeat steps 1 & 2 to create lots of flags for the bunting.

4. Next you need to thread all the flags onto the string and make sure they're facing the right way (with the fold on the back). I secured a pin to one end of the string and fed it through the casing on each flag. Once all the flags are on make two loops at each end of the string and hey presto, you've got yourself some cheat's bunting! Simple as :)
The BBQ was a great success thanks to Mitch's expert cooking as well as a couple of our friends who also supplied some tasty eats and a bottle of fizz! To top it all off, some people stayed to watch the Olympics closing ceremony - I can't believe how quickly the last two weeks have gone - I've enjoyed every minute of it...roll on the Paralympics I say!

Saturday, 19 May 2012

butterflies

Butterfly cakes were the first ever cakes I learned to make, and today I got the sudden urge to whip up a batch using the same recipe (my mum's) from when I was little. Behold!


For the sponge:
4 oz caster sugar
4 oz unsalted butter - softened
4 oz self raising flour
2 eggs
1 tsp vanilla extract

For the icing:
2 oz icing sugar
2 oz unsalted butter
1 tsp of milk
optional: 1 tsp of vanilla extract

Mix together the butter and sugar until there's no butter lumps.
Add the eggs, flour and vanilla extract until well combined.
Divide the mixture into cake cases (this recipe makes 12 little cakes, about 8 muffin sized ones) and bake in a pre-heated oven at 180 degrees C for 15-20 mins. The sponge should look golden in colour. I always check that they're cooked in the middle too with a cocktail stick.
To make the icing, combine the sugar, butter and milk (the milk is there to provide a bit of moisture) until the mixture is smooth and creamy.
Allow the cakes to cool before cutting a circle off the top to make a well for the icing to go in, the deeper the well the more icing is needed. I'm quite rubbish at dividing things equally and on this occasion, just like when I was young, the first cakes get a generous helping of icing which means the last few cakes are relatively icing free. Oh well, I think it's all part of the charm in homemade stuff! Take the cut out circle of cake and cut in half. Arrange the two halves on top of the icing to look like wings. Lightly sprinkle the finished cakes with icing sugar (optional, it just looks nice).
Enjoy with a cup of tea :)


Friday, 17 February 2012

February's Cushions

It's only mid-Feb and this month's project has been completed! 

My sewing machine had sat idle since Christmas so I was super keen to get back to it. The only three cushions I've ever made were all gifts and given away as Christmas presents so these two are for us and our previously cushion-less sofas! They've turned out rather well I reckon. Both covers were made to fit 35 x 35 cm cushion pads. The one on the left is made from lots of little scraps left over from making the quilt, christmas presents etc. And here's how I put it together....

 1. Cut a triangle with 7 x 7cm short sides plus 5mm seam allowance. Then cut strips of fabric in different lengths to make up the other half of the square. (I chose three strips but it could easily be 2 fatter ones, or 4 skinny ones but that would make it more fiddly as you need to allow for a 5mm seam allowance on the strips too!)

2. With right sides facing, stitch the longest strip to the long edge of the triangle. Again with right sides facing stitch the next strip to the free edge of the first strip. Finally sew the last strip to the free edge of the second strip with right sides facing.

3. Turn it the right way and you get something like this with uneven edges.

4. To smarten up those edges, mark out (on the back) the 7 x 7cm square (plus 5mm seam allowance on each side) and cut off the excess fabric.

5. The finished square should look a bit neater now.

6. Repeat steps to make numerous squares and then sew together. This completes the front of the cushion cover.

7. To make the back cut out two rectangles, the long edges need to be 35 cm in length, plus 5mm seam allowances all the way around. One rectangle needs to have bigger short edges so that the rectangles overlap each other to make an opening. 

8. Hem one long edge on each of the rectangles. With right sides facing (hemmed edge NOT on the outer edge) pin the rectangles to the front and stitch all the way around the outer edges of the cushion. Turn inside out using the opening and insert the cushion pad. Voila! Hope that makes sense!

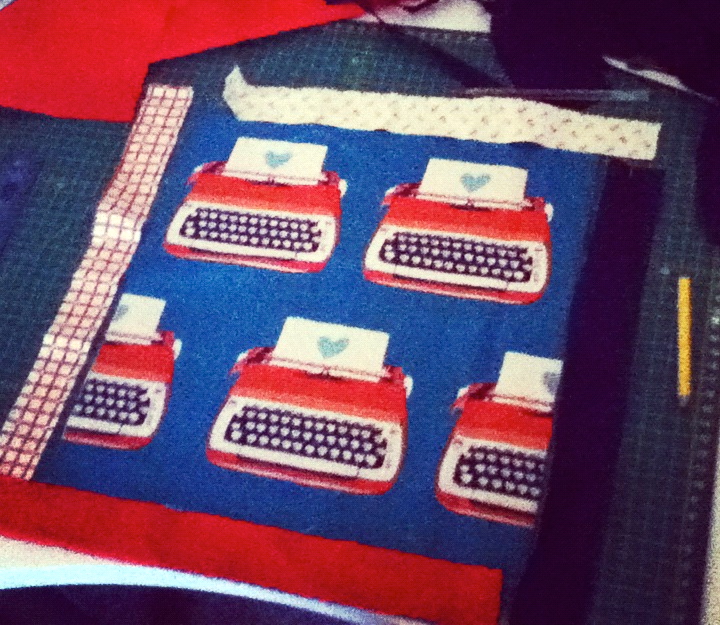
The typewriter cushion was much more straight forward but looking at the finished item I should've made the boarders a couple of cm wider...oh well, something learnt for next time. Lastly, as the sewing machine was back out in force I also got to do a bit of work on the quilt. All the patchwork blocks have been completed so I'm now in the process of joining them all together. Not long now until the top is finished and the business of wadding and quilting can begin!


Related Posts Plugin for WordPress, Blogger...